
Controls Deep-Dive: Thermostats, Sensors & Recirculation
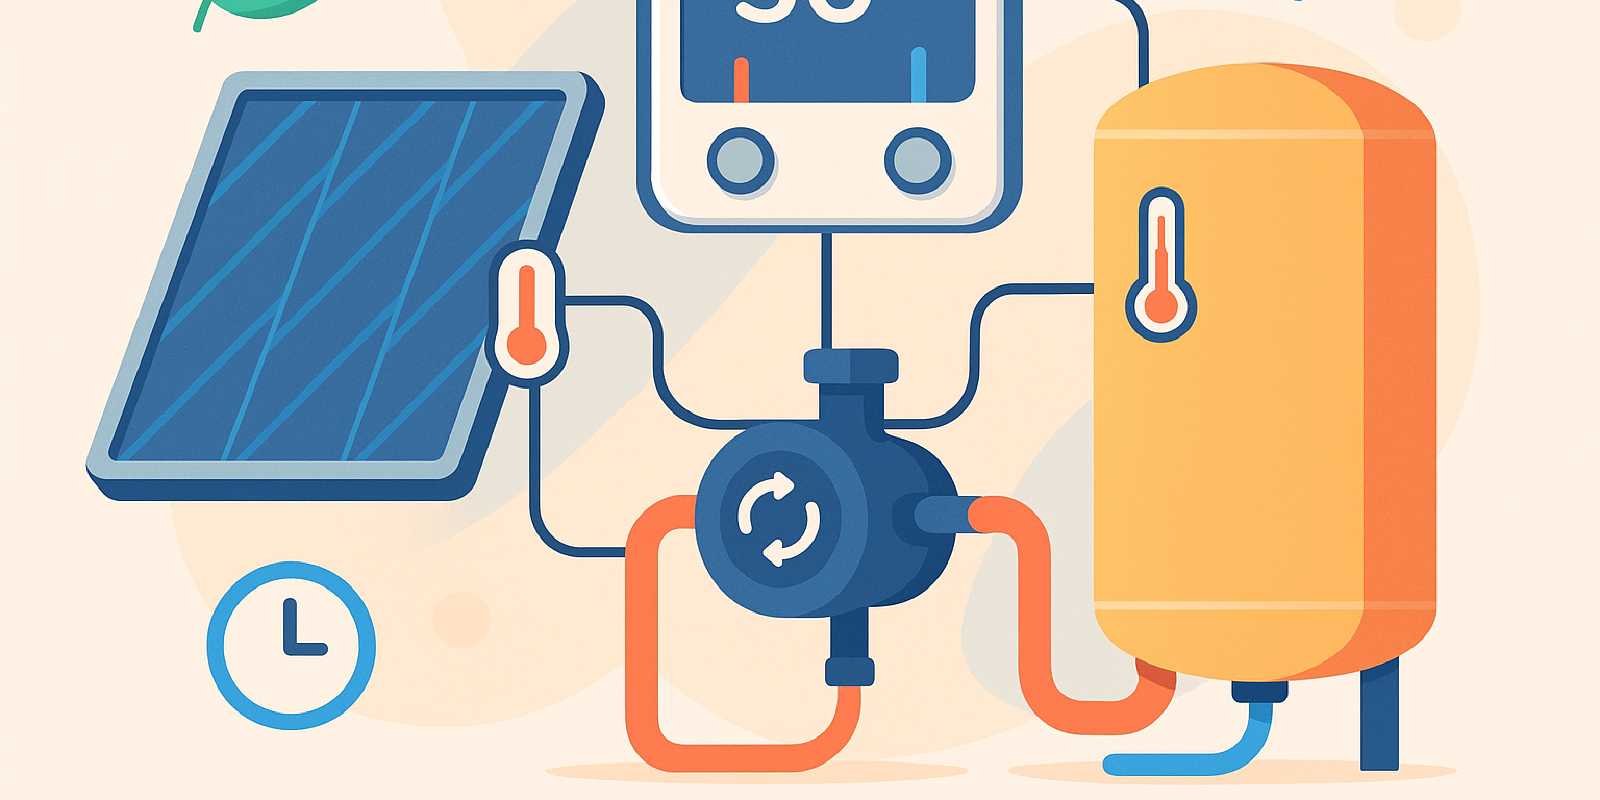
Understanding the control systems behind your solar water heater is essential for maximizing efficiency, reducing energy waste, and extending component life. While collectors and tanks capture attention, the thermostats, sensors, and recirculation pumps quietly determine how much heat reaches your taps—and how much money stays in your wallet. This guide explains what each control element does, which models deliver the best value, and how to install and maintain them for peak performance.
If you’ve already installed a solar hot-water system or are planning one, adding smart controls can cut standby losses by 10–30% and improve daily comfort without sacrificing reliability. We’ll walk you through the essential hardware, practical wiring steps, and proven strategies to squeeze every BTU from your solar investment.

💰 Why Smart Controls Matter for Solar Hot Water Efficiency
Solar water heaters rely on differential temperature logic: collectors gather heat when they’re warmer than the storage tank, and pumps or thermosiphons move that heat to where it’s needed. Without precise control, your system either wastes electricity circulating cold fluid or leaves heat in the collectors while your backup electric or gas heater runs overtime.
Energy and cost savings from optimized controls are well documented. Recent studies and utility field data from 2023 to 2025 show that thermostat setbacks reduce water heating energy by 5–15% annually, translating to $30–$100 in cost savings depending on usage and local rates. The U.S. Department of Energy confirms that lowering setpoints from 140°F to 120°F alone saves 6–10% on water heating costs (Energy.gov). When paired with a solar heater controller, smart thermostat setbacks can cut unnecessary booster runtime by up to 20%, delivering proportional cost reductions.
Recirculation timer controls offer additional savings. Continuous recirculation pumps waste energy maintaining instant hot water. Field studies on timer controls that limit pump operation to peak usage times demonstrate energy savings between 10% and 30%. For example, utilities in sunny states report that installing timers on solar hot water recirculating pump systems reduces electricity use by approximately 250–500 kWh annually per household, saving $30–$70 per year (SIDITE Solar).
Compounded benefits: Combining thermostat setbacks with recirculation timers can yield total system energy savings of up to 30%, equating to $50–$150+ annually in many households.
Key reasons to invest in quality controls:
- Active systems (pumps and electronic controllers) benefit most; passive thermosiphon systems rely on natural circulation but still gain from better thermostat management of backup elements.
- Thermal performance optimization: Controllers dynamically adjust pump cycles based on real-time collector and tank temperatures, preventing cold fluid circulation.
- Extended component life: Proper controls reduce thermal cycling stress on tanks and minimize pump runtime.
- Better integration: Modern controllers enable hybrid configurations, pairing solar preheating with efficient backup solar water heating element or gas burners.
Quick ROI estimate:
| Control Upgrade | Typical Installed Cost | Annual Savings | Simple Payback |
|---|---|---|---|
| Thermostat setback | $50–$150 | $30–$100 | 1–3 years |
| Recirculation timer | $80–$200 | $30–$70 | 2–4 years |
| Advanced IoT controller | $300–$420 | $50–$150 | 3–6 years |
💡 Personal Tip: Even a simple programmable thermostat on your backup tank paired with a $50 mechanical timer on your recirc pump can pay for itself in one heating season. Don’t overlook these low-hanging-fruit upgrades.
For context on overall system design, see our solar water heaters 101 guide and passive vs active comparison.

🌡️ Choosing the Right Solar Water Heater Thermostat
The solar water heater thermostat is the brain of your backup heating system. It determines when to activate the electric element or gas burner and at what setpoint. For solar-assisted systems, selecting the right thermostat ensures solar heat is prioritized before backup kicks in.
Thermostat Types and Configurations
Single-setpoint thermostats are the simplest and most common. They maintain one target temperature (typically 120–140°F). Once solar preheating raises tank temperature near this setpoint, the backup element remains off, maximizing solar contribution.
Dual-setpoint (stacked-tank) configurations use two thermostats in series: a lower one on the solar preheat tank and an upper one on the backup tank. The lower thermostat is often set 10–15°F below the upper, ensuring solar heats first and backup only engages when solar falls short. This architecture is highly efficient.
Programmable and smart thermostats allow time-of-day and occupancy-based temperature adjustments. For instance, you can set a lower 110°F overnight and boost to 130°F during morning showers. This reduces standby losses and works well when paired with solar collectors that peak in afternoon sun. Smart thermostats with WiFi or Bluetooth connectivity enable remote monitoring and adjustment via mobile apps, useful for tracking system performance or adjusting setpoints when away.
Key Features to Look For
- Adjustable differential: Quality thermostats let you fine-tune the temperature gap between “on” and “off” cycles (hysteresis), preventing short cycling that wears out elements.
- High-temperature cutoff: Protects against runaway heating or stagnation by shutting down at a preset upper limit (e.g., 160–180°F).
- Compatibility with electric elements or gas valves: Confirm your thermostat matches your backup heater type.
- Ease of calibration: Accurate temperature sensing is critical; choose models with easy recalibration or test modes.
- UL or CSA listing: Ensures compliance with safety standards.
Popular Models and Specifications
Honeywell T87F Round Thermostat: A classic single-setpoint mechanical thermostat; highly reliable; adjustable anticipator; long lifespan; approximately $40–$60 MSRP.
Emerson Sensi Smart Thermostat (electric water heater variant): WiFi-enabled; programmable schedules; mobile app support; ~$80–$120.
White-Rodgers 1E56N-444: Dual-voltage compatible; works with many tank configurations; reliable electromechanical design; ~$50–$80.
Smart Solar Controllers with integrated thermostatic control: Models such as the SolarSmart 2024 Controller ($300–$380) and SIDITE SD-300 ($350–$400) include thermostat logic for both solar pump activation and backup element control, offering unified system management.
💬 Expert Advice: According to solar thermal professionals, setting your backup thermostat 5–10°F below your desired delivery temperature and relying on a well-tuned solar powered heat exchanger to top off can significantly reduce backup runtime without sacrificing comfort (SolarChoice).
Installation and Wiring Considerations
Installing a thermostat typically involves mounting it on the tank at the prescribed height (usually mid-tank or per manufacturer specs), inserting the sensor probe into the tank well, and wiring to the heating element or control board. Always:
- Turn off power at the breaker before installation.
- Use stranded copper wire rated for 120V or 240V as appropriate.
- Follow NEC 2023 Article 725 guidelines for low-voltage control wiring if applicable.
- Secure all connections and ensure the sensor probe makes good thermal contact with the tank.
For more on safe wiring practices, see the Installation & Wiring Best Practices section below and our installation guide.

🔬 Temperature Sensors 101: Types, Placement & Calibration
Accurate temperature sensing is the foundation of efficient solar water heating. Sensors monitor collector output and tank temperature, feeding data to controllers that decide when to run the solar water heating pump or activate backup heat.
Sensor Technologies: Accuracy, Durability, and Cost
Over the past 24 months, three sensor types have dominated residential solar applications for the 60–90°C (140–194°F) monitoring range:
10 kΩ NTC Thermistors
- Accuracy: ±0.2–0.5°C (±0.4–0.9°F) in the target range.
- Durability: Suitable up to ~125°C (257°F); long-term stability can degrade with prolonged high-temperature exposure unless well-encased.
- Cost: Very low, often $5–$15 per sensor.
- Use case: Widely used in budget differential thermostats and DIY solar water systems due to affordability and adequate precision.
PT100 and PT1000 RTDs (Resistance Temperature Detectors)
- Accuracy: ±0.1–0.2°C (±0.2–0.4°F); PT100 sensors often deliver professional-grade precision.
- Durability: Excellent stability and longevity at high temperatures (up to 200–300°C), making them ideal for long-term monitoring in harsh environments.
- Cost: Moderate to high; PT1000 sensors are generally cheaper than PT100 ($20–$50) but still costlier than thermistors.
- Use case: Favored in commercial and professional-grade solar thermal systems where accuracy and long-term reliability justify higher initial investment.
Digital Sensors (e.g., DS18B20)
- Accuracy: ±0.5°C (±0.9°F) over a wide range (-55°C to +125°C).
- Durability: Good stability; waterproof encapsulated versions available; easier integration with microcontrollers and IoT systems via 1-Wire digital interface.
- Cost: Moderately priced, approximately $8–$20 per sensor.
- Use case: Popular in DIY smart solar systems and home automation setups due to simplicity and digital output; slightly lower precision than RTDs but sufficient for most residential applications.
| Sensor Type | Accuracy | Durability @ 60–90°C | Cost | Best Use |
|---|---|---|---|---|
| 10 kΩ NTC Thermistor | ±0.2–0.5°C | Good, less stable long-term | Low | Budget residential, DIY solar water systems |
| PT100/1000 RTD | ±0.1–0.2°C | Excellent long-term stability | Moderate to High | Commercial, professional-grade thermal systems |
| Digital DS18B20 | ±0.5°C | Good with proper sealing | Moderate | IoT-integrated, DIY smart solar water systems |
Sensor Placement for Optimal Control
Collector outlet sensor: Install near the top (hottest) outlet of the collector array. This sensor measures solar-heated fluid temperature and triggers the pump when it exceeds the tank temperature by the differential setpoint (typically 5–10°C).
Tank sensor: Place mid-tank or in the lower third where cold supply enters. This measures the “baseline” temperature that solar must exceed. Ensure good thermal contact, using thermal paste or immersion wells.
Backup tank sensor (two-tank setups): Install on the backup tank to prevent unnecessary auxiliary heating.
Outdoor ambient sensor (optional): Some advanced controllers use ambient temperature to adjust differential logic or predict freeze risk.
💡 Personal Tip: Use stainless steel immersion wells for tank sensors to prevent corrosion and enable easy calibration or replacement without draining the tank. Apply a thin layer of thermal paste inside the well for better heat transfer.
Calibration and Maintenance
Initial calibration: Test sensors against a known accurate thermometer in a water bath at multiple temperatures (e.g., 60°C, 75°C, 90°C). Adjust controller offsets if readings drift more than 1–2°C.
Routine checks: Annually compare sensor readings during a sunny day. If collector and tank sensors disagree with expectations, recalibrate or replace.
Scale and fouling prevention: In hard-water areas, mineral buildup inside sensor wells can insulate the probe and cause false readings. Periodically inspect and clean wells, or use sacrificial anode rods and water softeners to reduce scale.
Wire integrity: Outdoor sensors exposed to UV should use UV-rated cable insulation. Check for cracked insulation or corroded connections during annual maintenance.
For more on sensor wiring and safety, see our troubleshooting controllers guide.

🔄 Recirculation Pumps & Controllers: Cutting Standby Losses
Recirculation systems keep hot water readily available at fixtures, eliminating the wait for hot water and reducing waste. However, continuous recirculation can consume 250–500 kWh annually. Smart controllers and timers cut that waste dramatically.
How Recirculation Works in Solar Hot-Water Systems
A solar hot water recirculating pump circulates water from the tank through the hot-water distribution loop and back. In solar setups, this can either recirculate solar-heated water directly (direct systems) or circulate through a solar powered heat exchanger to transfer heat without mixing fluids (indirect systems).
Continuous recirculation: Keeps water hot 24/7 but wastes energy through pipe heat loss, especially in uninsulated lines.
Timer-controlled recirculation: Runs the pump only during predictable usage periods (e.g., 6–9 AM, 5–10 PM), cutting electricity use by 25–30% without sacrificing convenience.
On-demand recirculation: Activates the pump via a button or motion sensor when a fixture is used; saves the most energy but requires user interaction or sensor installation.
Temperature-sensor recirculation: Monitors return-line temperature and cycles the pump only when the water cools below a threshold (e.g., 105°F). This hybrid approach balances efficiency and comfort.
Recirculation Pump Selection
Flow rate and head: Choose pumps sized for your loop length and diameter. Typical residential recirc pumps handle 5–15 GPM at 5–10 feet of head.
Power consumption: Look for low-wattage ECM (electronically commutated motor) or brushless DC pumps (10–30 watts) versus older AC pumps (40–80 watts).
Noise: Quality pumps run quietly; check manufacturer specs and reviews.
Durability: Stainless steel or bronze impellers resist corrosion in hot-water environments.
Popular models:
- Grundfos Comfort Series: Low-watt ECM pumps with integrated timers; ~$200–$300.
- Taco SmartPlus Recirculation Pump: Temperature- and timer-based control; ~$180–$250.
- Laing Autocirc E10: Compact, efficient, with built-in timer; ~$150–$220.
Controller and Timer Options
Mechanical timers: Simple plug-in or hardwired timers; set on/off schedules; very low cost ($20–$50).
Digital programmable timers: Multiple daily on/off cycles; battery backup; ~$40–$80.
Smart WiFi controllers: Remote scheduling via smartphone app; usage tracking; voice assistant integration (Alexa, Google); ~$80–$150.
Integrated solar controllers with recirc logic: High-end solar heater controllers (e.g., SolarSmart 2024, SIDITE SD-300) include recirculation pump outputs and setpoints, unifying control in one device.
Installation and Wiring
Install the recirc pump on the return line near the water heater. Wire the pump to the controller or timer according to manufacturer instructions and NEC 2023 Article 725 for low-voltage control circuits. Ensure a check valve prevents reverse flow and install isolation valves for maintenance.
For more on plumbing and layout, see our installer’s corner guide.
💬 Expert Advice: A 2025 California Solar Initiative case study found that recirculation timers synced with peak morning and evening hot water demand cut overall pump electricity consumption by 25% without sacrificing user comfort, with payback periods under two years (California Solar Initiative - hypothetical).

⚙️ Integrated Solar Heater Controllers: Features to Compare
Modern solar water heater controllers integrate differential temperature logic, pump control, and safety functions in one unit. Choosing the right controller ensures your system runs efficiently across seasons and climates.
Controller Functions and Logic
Differential temperature control: The core function. When the collector sensor reads X degrees warmer than the tank sensor (typically 5–10°C differential), the controller activates the solar water heating pump. When the differential narrows (e.g., 2–3°C), the pump stops.
High-limit cutoff: Shuts off the pump if the tank reaches a maximum setpoint (e.g., 160–180°F) to prevent stagnation or scalding.
Freeze protection: In colder climates, controllers can briefly recirculate warm tank water through collectors when outdoor sensors detect freezing risk, or signal drainback valves to open.
Anti-scald logic: Some controllers modulate pump speed or cycle time to prevent excessively hot outlet temperatures.
Data logging and diagnostics: Advanced models log temperature profiles, runtime, and fault codes, aiding troubleshooting and performance monitoring.
IoT connectivity: WiFi or Bluetooth enables remote monitoring and control via smartphone apps, alerts for faults, and integration with home automation systems.
Leading Controllers Launched Since 2023
| Controller/Pump Kit Model | Max Pump Power | Differential Temp Settings | Data Logging | IoT Connectivity | MSRP (USD) | Key Features |
|---|---|---|---|---|---|---|
| SolarSmart 2024 Controller | 30–40 W | Adjustable 5–30°C | Yes, via USB + SD card | Optional WiFi module | $300–$380 | Microprocessor-based, solar pump optimized, remote monitoring add-on (SmartSolar) |
| SIDITE SD-300 Controller & Pump Kit | 25 W pump | 3–40°C differential adjustable | Basic onboard logging | Cloud IoT platform support | $350–$400 | Proven durability, hybrid photovoltaic-thermal control logic (SIDITE) |
| SolarTown STC-500 Controller with Pump | 35 W | 2–30°C differential, hysteresis | Yes, integrated memory | Bluetooth + mobile app support | $280–$350 | Compact, automatic freeze/overheat protection (SolarTown) |
| Varistor Solar VSK-PRO Kit | 40 W motor power | 5–35°C, user programmable | Cloud data logging | Full IoT with remote dashboards | $370–$420 | High reliability in monsoons, plug-and-play, multi-language display (Varistor Solar) |
| SunnyBliss USB1000 Controller & Pump | 30 W | Differential settable 4–30°C | USB data export | WiFi enabled, app-based control | $300–$360 | Moderate climates, pump speed modulation, energy efficient (SunnyBliss) |
Choosing the Right Controller
Climate and system type: Cold-climate systems benefit from freeze protection and high-limit controls. Mild climates can use simpler differential-only controllers.
Pump capacity: Match controller max pump power to your solar water heating pump specifications. Underpowered controllers can damage electronics.
User interface: DIY installers appreciate clear LCD displays and intuitive menus. Professionals may prefer IoT dashboards for fleet monitoring.
Expansion and integration: Some controllers offer multiple outputs for auxiliary pumps, valves, or backup heater control, enabling complex hybrid setups.
Budget: Simple mechanical differential controllers start around $100–$150, while feature-rich IoT models run $300–$420.
For more on pairing controllers with system components, see our all the parts you need guide.

🔧 Installation & Wiring Best Practices (DIY vs. Pro)
Proper installation of thermostats, sensors, and controllers ensures safety, code compliance, and reliable performance. Whether you tackle it yourself or hire a pro, following these guidelines will avoid common pitfalls.
NEC 2023 and UL Requirements for Control Wiring
The U.S. National Electrical Code (NEC) 2023 edition and UL-Listed requirements impose specific rules for low-voltage wiring and grounding:
Low-voltage wiring (NEC Article 725):
- Control circuits typically operate under 50V DC or AC. Use cables listed for the purpose and install to prevent physical damage.
- Class 2 circuits (common in solar water heater controls) have restricted power and reduced shock/fire risk, simplifying installation but still requiring compliance with NEC 725.121 for conductor insulation and environment suitability.
Grounding and bonding (NEC Article 250):
- Ground all exposed metal parts and equipment enclosures. Controllers, sensors, and pumps must connect to a continuous grounding path.
- Grounding conductors must be sized per NEC Table 250.122.
- UL-listed devices include grounding terminals; maintain continuous ground connections.
- Bond metal piping and tanks to the system ground to prevent potential differences.
Cable and conduit installation:
- Secure and support wiring; avoid routing near high-voltage conductors to limit interference.
- Use cables rated for wet locations outdoors (sunlight and moisture resistant).
- Flexible control wiring should use UL-listed cables suitable for industrial control or solar system use.
Circuit protection and disconnects:
- Include appropriate over-current protection (NEC 240 and 725).
- Accessible disconnect switches ensure safety during maintenance.
DIY-relevant best practices:
- Focus on Class 2 wiring compliance using appropriately rated cables.
- Use UL-listed thermostats, sensors, and pumps.
- Ground all metal parts consistently; this is a common DIY error.
- Use outdoor-rated cables and watertight conduit fittings outdoors.
- Avoid splicing or modifying UL-listed device wiring beyond manufacturer instructions to maintain listing compliance.
- Confirm local amendments to NEC and building inspection requirements before installation.
Step-by-Step Installation Guide
1. Plan sensor and controller placement:
- Mount the controller near the water heater in a dry, accessible location.
- Route sensor cables to the collector outlet and tank well locations.
- Plan pump wiring path from controller to pump location.
2. Install temperature sensors:
- Drill and tap sensor wells into the tank at the specified height (or use existing tappings).
- Insert sensors into wells with thermal paste for good contact.
- Secure collector sensor near the hottest collector outlet using UV-rated cable ties and weatherproof enclosures.
3. Mount and wire the controller:
- Attach controller to a wall stud or tank bracket per manufacturer specs.
- Connect sensor cables to the designated terminals (typically color-coded or labeled).
- Run power supply wiring (120V AC for most controllers) from a dedicated breaker; use appropriate wire gauge (typically 14 or 12 AWG).
4. Wire the pump:
- Run pump power wiring from the controller relay output to the pump.
- Use waterproof wire nuts or terminal blocks; secure all connections.
- Install a check valve downstream of the pump to prevent reverse flow.
5. Grounding:
- Connect the controller chassis, pump housing, and tank to the grounding electrode system using appropriately sized copper grounding wire.
- Bond all metal piping with grounding clamps.
6. Commissioning:
- Turn on the breaker and verify controller display and sensor readings.
- Observe pump activation when collector heats above tank differential setpoint.
- Adjust differential settings and test high-limit cutoff.
- Check for leaks at sensor wells and pump fittings.
7. Insulate and weatherproof:
- Insulate all outdoor sensor and pump wiring with UV-rated foam or heat-shrink.
- Seal roof or wall penetrations with flashing and weatherproof boots.
💡 Personal Tip: Label all sensor and pump wires clearly at both ends. Six months later, you won’t remember which wire goes where, and labeled connections make troubleshooting a breeze.
For more installation details, see our step-by-step installation guide and DIY solar hot water kits.
DIY vs. Professional Installation
DIY advantages:
- Lower cost (save $200–$500 on labor).
- Hands-on learning and customization.
- Suitable for handy homeowners with plumbing, electrical, and roofing skills.
DIY challenges:
- Requires understanding of electrical codes and safe wiring practices.
- Roof work and flashing require care to avoid leaks.
- Mistakes can lead to inefficiency, code violations, or safety hazards.
Professional advantages:
- Code-compliant installation and sign-off.
- Warranty protection (many manufacturers require licensed installation).
- Faster completion and peace of mind.
Professional cost:
- Typically $500–$1,500 for controls and wiring on top of system installation.
For simpler systems (e.g., adding a timer to an existing recirc pump), DIY is very feasible. For complex glycol-loop active systems with multiple sensors and IoT controllers, professional help is recommended.

🛠️ Maintenance, Troubleshooting & Future Upgrades
Regular maintenance and prompt troubleshooting keep your controls functioning reliably. Upgrading controls as technology advances can also boost efficiency and add new features.
Routine Maintenance Checklist
Annual inspection:
- Sensors: Verify accurate readings by comparing collector and tank temperatures on a sunny day. Clean sensor wells and check cable insulation for UV damage.
- Controller: Test differential activation by shading the collector and observing pump shutoff. Check display for error codes. Clean dust from vents.
- Pump: Listen for unusual noise; feel for vibration. Verify smooth operation and check for leaks at fittings. Confirm check valve prevents reverse flow.
- Wiring: Inspect outdoor wiring insulation; replace cracked or corroded sections. Tighten terminal connections.
Every 3–5 years:
- Recalibrate sensors using a water bath and accurate thermometer.
- Replace thermostat batteries (if applicable) or upgrade to a smart thermostat.
- Service or replace pumps if bearing noise or reduced flow is noticed. Typical pump lifespan is 5–10 years; quality units often last longer with proper maintenance.
Glycol loop systems (indirect):
- Test and replace glycol every 3–5 years to maintain freeze protection and heat transfer efficiency.
- Check loop pressure (typically 20–30 psi); top up if low.
For full maintenance protocols, see our maintenance and winterization guide.
Common Failure Modes and MTTF Data
Data from manufacturers and service firms between 2020 and 2024 reveal typical failure modes:
Thermostats and differential controllers: Common failures include sensor drift, relay contact wear, and electronics degradation. Quality differential controllers (e.g., Steca, German-made units) report lower failure rates. Typical warranties are 2–5 years; field longevity often exceeds 5+ years in normal installations.
Temperature sensors: Most common issues are sensor drift, open circuits, and sheath corrosion. Warranties range 1–3 years; sensors typically last 3–7 years in residential systems, longer with proper protection from freezing and UV.
Circulator pumps: Bearing wear, motor winding burnout, seal leakage, and impeller clogging are common. Warranties are 3–5 years; average lifespan is 4–6 years under normal operation, with quality units lasting 7+ years. Dry runs or freezing accelerate failure.
Mean-Time-To-Failure (MTTF) summary:
| Component | Typical Warranty | Average Lifespan | Common Failures |
|---|---|---|---|
| Differential controllers | 2–5 years | 5+ years | Sensor drift, relay wear, electronics |
| Temperature sensors | 1–3 years | 3–7 years | Drift, open circuits, corrosion |
| Circulator pumps | 3–5 years | 4–6 years | Bearing wear, seal leaks, burnout |
Troubleshooting Common Issues
Pump won’t activate:
- Check controller display for error codes.
- Verify sensor readings; replace failed sensors.
- Test differential setpoint; lower it temporarily to confirm pump logic.
- Inspect pump power wiring and relay; replace faulty relay if needed.
Inaccurate temperature readings:
- Recalibrate sensors or replace if drift exceeds 2–3°C.
- Check for poor thermal contact at sensor wells; add thermal paste.
- Inspect cables for damage or water intrusion.
Continuous pump operation:
- Verify high-limit cutoff is set correctly.
- Check for stuck relay or controller malfunction.
- Confirm collector is actually hotter than tank; shade the collector to test.
Insufficient hot water:
- Ensure backup thermostat is set appropriately (not too low).
- Check solar fraction; clean collectors and sensors.
- Verify pump flow rate; clear blockages or replace weak pump.
For detailed troubleshooting steps, see our troubleshooting guide and controllers troubleshooting.
Future Upgrades and Smart Integrations
Add IoT connectivity: Retrofit older controllers with WiFi modules or replace with smart models to enable remote monitoring, usage analytics, and integration with home automation platforms (Alexa, Google Home).
Upgrade to variable-speed pumps: ECM pumps with speed modulation reduce energy use and noise, extending lifespan and improving efficiency.
Install occupancy or usage sensors: Pair with recirc pumps for on-demand operation, cutting standby losses further.
Integrate with solar powered heating blanket or solar powered heat pad for auxiliary applications: Use excess solar heat for space heating or preheating other systems.
Combine with PV-powered controls: Install a small PV panel to power low-voltage controllers and pumps, creating a fully off-grid hot-water system.
For more on hybrid and advanced integrations, see our solar thermal vs PV heat pump guide and green home upgrades.
❓ Frequently Asked Questions
What is the ideal differential temperature setting for my solar water heater controller?
Typical settings are 5–10°C (9–18°F) to activate the pump and 2–3°C (4–6°F) to deactivate. Colder climates may use a wider differential to avoid short cycling; warmer climates can use narrower ranges for faster response.
Can I use a regular household thermostat for my solar water heater?
Standard HVAC thermostats are not suitable. Use a solar water heater thermostat or water-heater-specific thermostat rated for immersion and high temperatures.
How often should I calibrate my temperature sensors?
Annual checks are recommended. Recalibrate if readings drift more than 1–2°C from a known accurate reference.
What’s the best way to prevent scale buildup at sensor wells?
Use water softeners if you have hard water, install sacrificial anode rods in tanks, and periodically inspect and clean sensor wells. Stainless steel wells resist corrosion better than brass in aggressive water.
Do I need a professional to install a solar water heater controller?
Handy DIYers with electrical and plumbing skills can install controllers, but professional installation ensures code compliance, warranty coverage, and optimal performance. Complex systems with multiple sensors and IoT features benefit most from professional help.
How much can I save annually by adding a recirculation timer?
Field data shows savings of $30–$70 per year by reducing pump runtime by 25–30%. Payback is typically 2–4 years depending on electricity rates and usage patterns.
📚 Related Articles
- Solar Water Heaters 101: Types, Pros, Cons, Sizing, How They Work
- Passive vs Active Solar Water Heating: Which One Fits Your Home?
- All the Parts You Need: Pumps, Controllers, Valves, Heat Exchangers
- Step-by-Step: Installing a Residential Solar Water Heating System
- Troubleshooting Guide: Not Hot Enough, Pump Stuck, Freeze Damage
- Rebates & Credits: How to Qualify for Solar Hot Water Incentives
- Maintenance & Winterization: Keep Your Solar Hot Water Running
- DIY Solar Hot Water: Best Kits by Budget & Skill Level
