
Radiant & Hydronic: Using Solar Heat Exchangers & Floors
Imagine walking barefoot across your floor on a cold morning and feeling only warmth rising from below—all powered by sunshine. Solar powered radiant heating transforms your home’s floors into a silent, efficient heat radiator. Unlike noisy forced-air systems, radiant floors deliver consistent comfort while cutting heating costs by up to 30% and eliminating drafts. This guide explains exactly how to integrate solar collectors with heat exchangers and hydronic floor systems to achieve 60–80% solar heating in single-family homes.
Whether you’re building new construction in Arizona or retrofitting a Colorado home, you’ll discover practical sizing formulas, tubing layout strategies, real installation costs, and maintenance protocols that keep your system running for decades.

🌞 Solar-Powered Radiant Heating: How It Works
Solar powered radiant heat harnesses rooftop collectors to warm water or glycol, which then circulates through tubing embedded in your floors. The floor mass becomes a giant thermal battery, radiating heat upward into living spaces long after the sun sets.
The Core Components
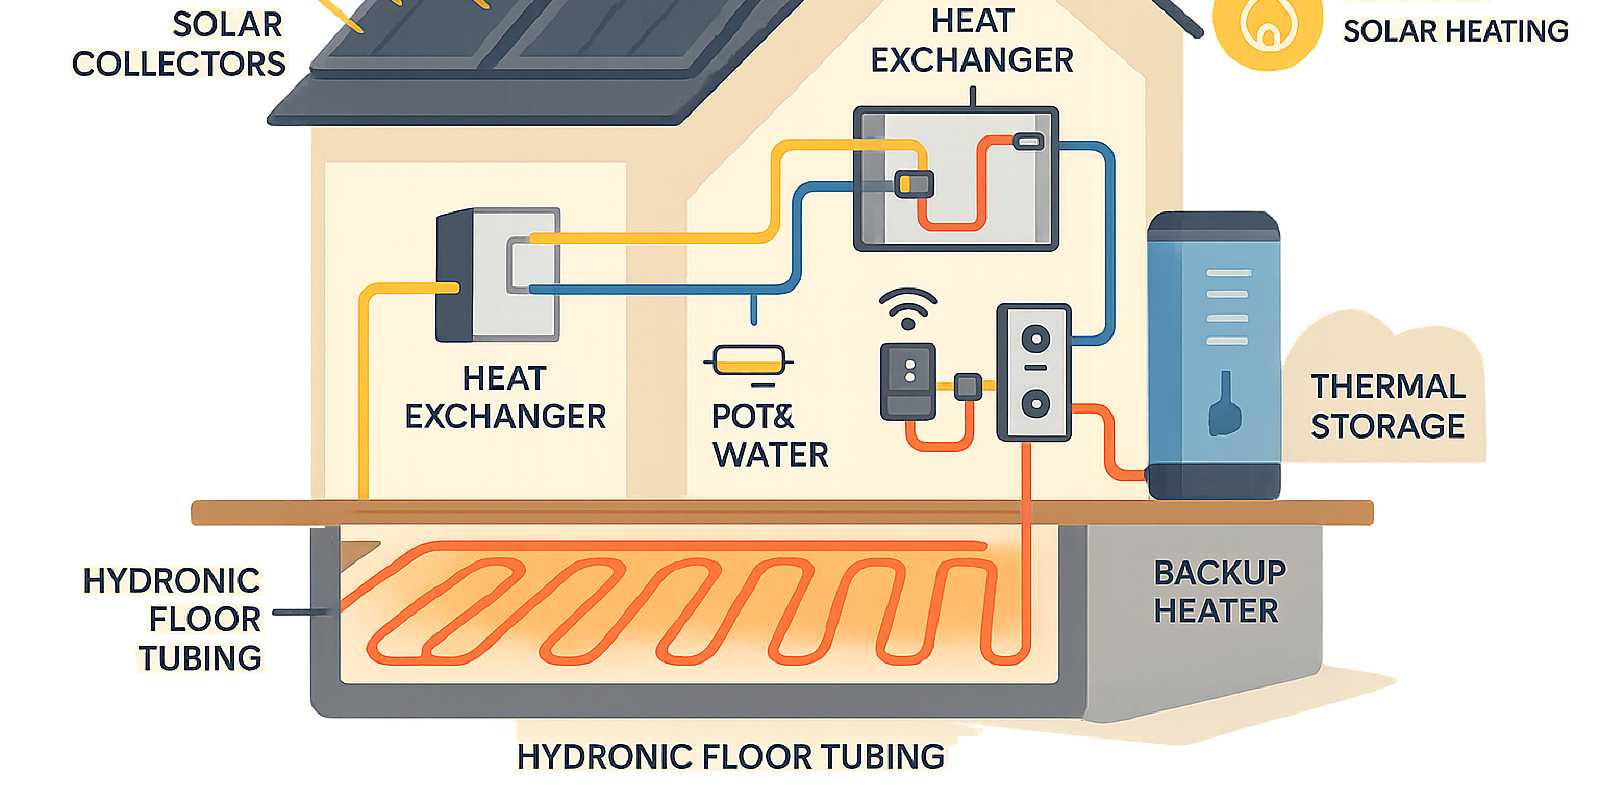
A complete solar powered underfloor heating system includes:
- Solar collectors: Flat-plate or evacuated-tube panels mounted on your roof that absorb sunlight and transfer heat to circulating fluid.
- Heat exchanger: Separates the antifreeze loop (solar circuit) from the clean water loop (floor circuit), preventing contamination while transferring thermal energy efficiently.
- Storage tank: Holds 120–200 gallons of heated water, buffering solar input for cloudy periods and overnight heating.
- Hydronic floor loops: PEX tubing embedded in concrete slabs or stapled beneath wood subfloors, spaced 6–12 inches apart depending on heat load.
- Pump and controls: Circulates fluid when collector temperature exceeds tank temperature; zone valves direct heat to different rooms.
- Backup heater: Electric or gas boiler covers extended cloudy weather and peak demand periods.
💡 Personal Tip: Start with a solar heat exchanger rated for at least 50,000 BTU/hr. Undersized exchangers become bottlenecks, forcing your backup heater to work overtime even when collectors are producing heat.
How Solar Thermal Energy Reaches Your Floors
On sunny days, collectors heat a water-glycol mixture to 120–160°F. This fluid flows through one side of the heat exchanger while clean water for the floor loop flows through the other side. The exchanger transfers heat without mixing fluids—critical because glycol is toxic and floor loops require potable-grade water in some jurisdictions.
The heated floor-loop water (typically 85–110°F for slab floors, 110–130°F for wood subfloors) circulates through PEX tubing. The concrete or wood absorbs this heat, then radiates it upward. Because radiant systems operate at lower temperatures than baseboard or forced-air systems, they match perfectly with solar collectors, which work most efficiently at moderate temperatures.
Energy Flow: Sun to Floor
- Collection: Collectors absorb 40–70% of incident solar radiation as heat.
- Transfer: A differential controller senses when collector temperature exceeds tank temperature by 5–10°C and activates the pump.
- Storage: Heated fluid passes through the heat exchanger, warming the tank to 120–160°F during peak sun hours.
- Distribution: Zone pumps draw warm water from the tank, circulate it through floor loops, and return cooler water to the tank bottom for reheating.
- Backup: When tank temperature drops below your setpoint (usually 100–110°F), the backup heater tops up the tank to maintain comfort.
This closed-loop design means you’re not wasting energy heating air ducts or losing heat through long pipe runs—radiant floor heating is more efficient than baseboard heating and typically more efficient than forced-air systems because it eliminates duct losses.
Why Solar Matches Radiant Floors Perfectly
Temperature compatibility: Solar collectors deliver their highest efficiency at moderate temperatures (90–140°F), which aligns precisely with radiant floor requirements (85–130°F). Forced-air systems demand 140–180°F supply temperatures, pushing solar collectors into lower-efficiency zones.
Thermal mass: Concrete slab floors store heat for 6–12 hours, allowing you to collect solar energy during the day and release it gradually overnight—maximizing your solar fraction.
Comfort quality: Radiant heat warms surfaces and people directly rather than heating air. You can maintain the same comfort at 2–3°F lower thermostat settings, reducing heat loss through walls and ceilings.
For a deeper dive into how solar collectors generate hot water in the first place, see our guide on how solar water heaters work.

📐 Right-Sizing Your Solar Heat Exchanger, Tank & Collector Array
Undersizing loses savings; oversizing wastes capital. Recent case studies show that achieving a 60–80% solar fraction for a 2,000–3,000 sq ft home requires 80–160 sq ft of collector area, 120–200 gallons of storage, and a heat exchanger rated for 40,000–60,000 BTU/hr.
Collector Area: The Solar Workhorse
Northern U.S./Canada: Plan on approximately 1 collector per 300 sq ft of floor heating area. For a 2,400 sq ft home, that’s eight 4×10 ft flat-plate collectors (320 sq ft total collector area).
Mid-U.S. states (Zones 3–4): Approximately 1 collector per 400 sq ft suffices. The same 2,400 sq ft home needs six collectors (240 sq ft).
Sunny states (Zones 1–2): You may achieve good results with 1 collector per 500 sq ft, dropping the requirement to five collectors (200 sq ft).
💬 Expert Advice: A 2024 NREL case study found that a 2,500 sq ft home in Colorado achieved a 75% solar fraction with 140 sq ft (13 sq m) of flat-plate solar collectors. The system was designed for low-temperature radiant floor heating, and the collectors were mounted on a south-facing roof with minimal shading.
Evacuated tubes vs flat-plates: In cold or cloudy climates, evacuated tubes deliver superior winter performance. Tubes maintain efficiency even when ambient air is below freezing, while flat-plates lose more heat. For sunny, temperate regions, quality flat-plates offer better value per BTU.
Storage Tank Sizing
Rule of thumb: 1–1.5 gallons of storage per square foot of collector area. For 140 sq ft of collectors, that’s a 140–210 gallon tank. Most residential systems use 150–200 gallon tanks with built-in heat exchangers.
Stratification matters: Choose tanks with top and bottom inlet/outlet fittings to preserve temperature layers. Hot water naturally rises; cold water sinks. A well-stratified tank delivers hotter water to your floor loops and cooler return water to the collectors, boosting efficiency.
If you’re integrating solar into an existing system, consider a two-tank setup: solar preheat tank → conventional water heater. This approach simplifies installation and preserves your existing backup. See step-by-step installation guidance for wiring details.
Heat Exchanger Capacity
Your solar heating element—the heat exchanger—must transfer heat faster than your collectors produce it, or you’ll waste solar gain.
Sizing formula: Match your heat exchanger BTU/hr rating to 110–120% of peak collector output. A 140 sq ft array of flat-plates in strong sun produces roughly 50,000–60,000 BTU/hr, so spec a 60,000 BTU/hr exchanger minimum.
Exchanger types:
- Plate heat exchangers: Compact, high-efficiency, easy to service. Most popular for residential solar powered hydronic heating.
- Coil-in-tank: Heat exchanger coil submerged inside the storage tank. Simple, but harder to replace if fouling occurs.
- External tube-in-shell: Bulkier but effective for large systems or high-flow applications.
🚨 Important Note: Fouling from hard water or mineral buildup reduces heat-exchanger efficiency by 20–40% over time. Use treated or softened water on the potable side, and flush the exchanger with descaling agents every 3–5 years. Systems using glycol should have the fluid tested and replaced if pH or freeze-point degrade.
BTU Sizing Worksheet
Use this quick reference to estimate your heating load and collector area:
| Home Size (sq ft) | Heat Loss (BTU/hr)* | Collector Area (sq ft) | Storage (gal) | Heat Exchanger (BTU/hr) |
|---|---|---|---|---|
| 1,500 | 30,000–45,000 | 100–150 | 120–150 | 40,000–50,000 |
| 2,000 | 40,000–60,000 | 130–200 | 150–180 | 50,000–60,000 |
| 2,500 | 50,000–75,000 | 160–250 | 180–200 | 60,000–70,000 |
| 3,000 | 60,000–90,000 | 200–300 | 200–250 | 70,000–80,000 |
*Heat loss varies by insulation, climate, and window area. Use Manual J calculations for precise loads.
Climate adjustment: Multiply collector area by 0.8 for sunny states (Arizona, New Mexico, Southern California) or by 1.2 for cloudy/cold regions (Pacific Northwest, Great Lakes, New England).
For comprehensive system sizing and costs, explore our solar water heater costs and payback guide.

🔧 Designing the Radiant Floor: Tubing, Heat Mats & Zone Controls
Your floor is the final heat-delivery step—get the layout wrong and you’ll have cold spots or waste pump energy. Proper tubing spacing, embedded depth, and zone control transform solar heat into reliable comfort.
PEX Tubing Layout: Concrete vs Wood Subfloors
Concrete slabs (most common):
- Tubing spacing: 9–12 inches for well-insulated homes; 6–9 inches for older homes or high heat-loss areas.
- Embedded depth: Tubing should sit 1.5–2 inches below the finished surface, centered in a 4-inch slab. Deeper placement reduces response time; shallower risks cracking.
- Supply temperature: 85–110°F for concrete slabs. Concrete’s thermal mass stores heat efficiently, so lower temperatures work well.
Wood subfloors:
- Tubing spacing: 8–10 inches with aluminum heat-transfer plates; plates spread heat laterally, reducing the need for tight spacing.
- Installation method: Staple PEX to the underside of the subfloor (from basement/crawlspace) with plates, or rout channels in the subfloor and press tubing into plates.
- Supply temperature: 110–130°F for wood floors because wood conducts heat more slowly than concrete.
- Insulation below tubing: Essential. Install R-19 or better fiberglass/foam board under the tubing to prevent downward heat loss.
💡 Personal Tip: Ceramic tile is the most effective floor covering for radiant systems because it conducts heat well and adds thermal storage. Avoid thick carpet or vinyl—they insulate the floor from the room, cutting efficiency by 20–30%.
Solar Powered Heat Mats: An Alternative Approach
Solar powered heating mats or solar heating mats are pre-assembled panels containing embedded PEX tubing, insulation backing, and connection manifolds. They install faster than field-laid tubing and work well for retrofits or small zones.
Pros:
- ✅ Faster installation (unroll and connect vs. stapling individual runs)
- ✅ Consistent tubing spacing eliminates cold spots
- ✅ Built-in insulation layer reduces downward heat loss
- ✅ Good for thin-slab or dry-install systems
Cons:
- ❌ Higher material cost per square foot vs. bulk PEX
- ❌ Less layout flexibility in irregular rooms
- ❌ Limited availability in U.S. market (more common in Europe)
Most U.S. installers still prefer field-installed PEX with aluminum heat-transfer plates, which cost less and perform equivalently. Plates are especially critical for wood subfloors; research shows that thinner aluminum plates provide equivalent performance to thicker plates at half the cost.
Zone Controls: Maximizing Comfort & Efficiency
Why zone? Different rooms have different heat loads and schedules. Bedrooms may need warmth only at night; living spaces during the day. Zoning prevents overheating some rooms while underheating others, and it reduces pump runtime.
Zone strategies:
- Individual zone pumps: Each zone (bedroom wing, living area, basement) gets its own small circulator pump controlled by a thermostat. Using a single individual pump for each heating zone is most efficient, as homeowners pay monthly for pump energy. This contrasts with common industry practice of using one large pump with zone control valves.
- Zone valves with central pump: One large pump runs continuously; motorized valves open/close to direct flow to active zones. Simpler to install but wastes some pump energy.
- Manifold-based zoning: A central manifold distributes flow to multiple zones; each loop has a manual or motorized balancing valve.
Thermostat placement: Mount thermostats on interior walls away from windows, doors, and direct sunlight. Floor-sensing thermostats are ideal for radiant systems—they measure actual floor temperature and prevent overheating.
Smart controls: Modern controllers can learn your schedule, prioritize solar heating over backup, and display real-time solar contribution. Look for models compatible with solar differential controllers so the radiant zones activate only when the tank is warm enough.
Tubing Run Lengths & Flow Rates
Maximum loop length: Keep individual PEX loops under 300–400 feet to maintain adequate flow and minimize pump pressure requirements. Longer loops create excessive pressure drop and uneven heating.
Flow rate: Target 0.5–1.5 GPM per loop depending on tubing diameter and heat load. A 300-foot loop of ½-inch PEX typically flows 1 GPM at reasonable pressure.
Balancing: Use flow meters or balancing valves at the manifold to equalize flow across all loops. Unbalanced systems leave some rooms cold while others overheat.
For more detail on integrating pumps, valves, and controls, see our deep dive on controllers and automation.

🛠️ DIY vs Pro Installation: Step-By-Step Workflow
Professional installation ensures code compliance and warranty coverage, but capable DIYers can tackle portions of the work to save thousands. Here’s what each path entails.
Professional Installation Workflow
- Site assessment & heat-load calculation: Pro performs Manual J load calculation, confirms roof structure, and designs collector layout.
- System design: Sizes collectors, tank, exchanger, and zones; specifies tubing spacing and manifold locations.
- Permits & approvals: Pulls building and mechanical permits; coordinates inspections.
- Collector mounting: Flashes and mounts collectors on roof rafters; runs insulated glycol lines through attic/walls.
- Heat exchanger & tank installation: Places storage tank (often in basement/utility room); connects solar loop to exchanger coil; plumbs floor loops to manifold.
- Tubing installation: Embeds PEX in concrete slab (new construction) or installs beneath subfloor with heat plates (retrofit).
- Pump & controller wiring: Mounts differential controller; installs temperature sensors in collector and tank; wires zone pumps and backup heater.
- Glycol fill & pressurization: Fills solar loop with propylene glycol antifreeze; purges air; pressurizes to 20–30 psi.
- Commissioning & testing: Checks for leaks; verifies pump operation in sunshine; adjusts zone balancing; tests backup heater integration.
- User orientation: Explains system operation, setpoints, and routine maintenance tasks.
Timeframe: 3–5 days for typical residential install. Cost: $12,000–$25,000 for a complete system (collectors, tank, exchanger, floor loops, labor) depending on home size and complexity.
DIY Installation: What You Can Realistically Handle
Strong DIY candidates:
- Installing PEX tubing in slab or under subfloor (requires careful layout and pressure testing, but no specialized tools beyond a PEX crimper).
- Mounting collectors on a simple pitched roof with pre-engineered mounting kits.
- Plumbing tank and heat exchanger connections using compression or PEX fittings.
- Running insulated solar loop piping through accessible attic spaces.
Leave to the pros:
- Complex roof penetrations or tile/metal roofing.
- Electrical wiring for pumps and controllers (unless you’re a licensed electrician).
- Glycol system commissioning and balancing (air purging requires experience to avoid persistent airlocks).
- Final inspection sign-off if local codes require licensed contractor work.
💡 Personal Tip: Even if you DIY the floor tubing and basic plumbing, hiring a solar thermal pro for one day to commission the glycol loop, set the controller, and test all zones can prevent months of headaches. Budget $500–$1,000 for this final step.
Step-By-Step DIY Workflow
Phase 1: Planning & Design
- Calculate heat load and size collectors/tank using the worksheet above.
- Order a DIY solar water heater kit that includes collectors, tank, heat exchanger, pump, and controller.
- Draw floor-loop layout with 9–12 inch spacing; order PEX, manifold, and heat plates.
- Apply for permits (mechanical, plumbing, electrical as needed).
Phase 2: Floor Tubing Installation
- Install subfloor insulation (R-19 min. for wood floors; vapor barrier under concrete slabs).
- Lay out PEX tubing per your design; secure with staples (wood) or tie wire (concrete).
- Pressure-test loops to 80 psi for 24 hours; fix any leaks.
- Pour concrete slab (new construction) or close subfloor (retrofit).
Phase 3: Collector & Tank Installation
- Mount collectors on roof with flashing and lag bolts into rafters.
- Run insulated solar loop lines (typically ¾-inch PEX with heat tape and UV-rated insulation) from collectors to mechanical room.
- Set storage tank in place; connect cold inlet and hot outlet plumbing.
- Plumb heat exchanger between solar loop and floor-loop manifold.
Phase 4: Pump & Controller Setup
- Mount differential controller near tank; attach collector sensor to hottest collector outlet and tank sensor to mid-tank port.
- Wire pump to controller (follow manufacturer wiring diagram).
- Install zone pumps or valves; wire to thermostats.
- Connect backup heater (electric element or gas boiler) to upper tank port.
Phase 5: Glycol Fill & Commissioning
- Mix propylene glycol to manufacturer-recommended concentration (typically 30–50% for freeze protection to -20°F).
- Fill solar loop via fill port; circulate with pump to purge air through bleed valves.
- Pressurize loop to 20–30 psi; check for leaks.
- On a sunny day, verify pump activates when collector is 10°F hotter than tank.
- Adjust zone balancing to equalize flow; set floor thermostats to desired temperatures.
Phase 6: Documentation & Inspection
- Label all valves, sensors, and zones.
- Record glycol concentration and loop pressure in a logbook.
- Schedule final inspection if required by code.
- Test backup heater activation when tank temperature drops below setpoint.
For more detailed plumbing and wiring guidance, see our complete installation guide and pump/valve/controller primer.
DIY vs Pro Comparison Table
| Scope | DIY | Professional |
|---|---|---|
| Tubing install | ✅ Doable with care | ✅ Faster, guaranteed |
| Collector mounting | ⚠️ Simple roofs only | ✅ All roof types |
| Glycol commissioning | ❌ High risk of airlocks | ✅ Proper purge/test |
| Controller wiring | ⚠️ If electrician-skilled | ✅ Code-compliant |
| Warranty coverage | ⚠️ May void collector warranty | ✅ Full manufacturer warranty |
| Timeframe | 2–4 weekends | 3–5 days |
| Cost savings | $3,000–$8,000 | $0 (but pro results) |

💰 Real-World Performance, Costs & Incentives
How much does solar radiant floor heating cost, how much will you save, and how quickly do you break even? Case studies from 2024–2025 provide clear answers.
Real-World Case Study: 2,400 Sq Ft Arizona Home
System specs:
- 200 sq ft (five 4×10 ft) flat-plate collectors
- 180-gallon stratified storage tank with dual-coil heat exchanger
- 2,100 feet of ½-inch PEX in 9-inch spacing across concrete slab
- 60,000 BTU/hr plate heat exchanger
- Three zones with individual circulator pumps
- Gas backup boiler for cloudy periods
Performance:
- Solar fraction: 80% of annual heating load met by solar
- Annual heating cost before solar: $1,800 (natural gas)
- Annual heating cost after solar: $360 (gas backup only)
- Savings: $1,440/year
Economics:
- Installed cost: $22,000 (professional installation)
- Federal 30% tax credit: -$6,600
- Arizona state rebate: -$2,000
- Net cost: $13,400
- Simple payback: 9.3 years
- Lifetime savings (25 years): $36,000 – $13,400 = $22,600
💬 Expert Advice: A 2023 SRCC case study found that a 2,200 sq ft home in New Mexico achieved a 70% solar fraction with a 150-gallon (568-liter) storage tank. The system used a stratified tank design to maximize heat retention and minimize standby losses.
Installed Cost Ranges by Region
| Region | Collector Area (sq ft) | Installed Cost | Net Cost (After 30% Credit) |
|---|---|---|---|
| Sunny states | 160–200 | $18,000–$24,000 | $12,600–$16,800 |
| Mid-latitude | 180–240 | $20,000–$28,000 | $14,000–$19,600 |
| Cold/cloudy | 200–280 | $22,000–$32,000 | $15,400–$22,400 |
Costs include collectors, tank, heat exchanger, floor tubing, pump/controls, glycol, installation labor, and permits. DIY installations save $3,000–$8,000 but require significant time and skill.
Federal & State Incentives
U.S. Residential Clean Energy Credit (30%):
- Covers 30% of total installed cost through 2032
- Applies to complete systems with SRCC OG-300 certification
- Includes collectors, tank, heat exchanger, piping, pumps, controls, and labor
- Claim on IRS Form 5695; unused credit carries forward
State & Utility Rebates (examples):
- California: SGIP and local utility programs can add $1,000–$3,000
- Colorado: Xcel Energy rebates up to $1,800
- Arizona: SRP and APS offer $1,500–$2,500 solar thermal rebates
- Oregon: Energy Trust of Oregon pays $3,000–$5,000 for solar thermal
Check the Database of State Incentives for Renewables & Efficiency (DSIRE) for current programs in your state. For complete incentive guidance, see our rebates and tax credits article.
Annual Operating Savings
Heating cost reduction: Solar radiant systems typically achieve 50–80% solar fraction in well-designed installations, translating to:
- Natural gas: $800–$1,600/year savings (varies by local gas rates)
- Propane: $1,200–$2,400/year savings
- Electric resistance heat: $1,500–$3,000/year savings
- Heat pump backup: $600–$1,200/year savings
Pump energy use: Zone circulators and solar-loop pumps consume 150–400 kWh/year total ($18–$48/year at $0.12/kWh). High-efficiency ECM pumps reduce this by 30–50%.
Maintenance costs: Budget $100–$200/year for glycol testing, filter changes, and minor adjustments. Professional system checks every 3–5 years cost $300–$500.
Payback & ROI
Simple payback: 7–15 years in most regions; shorter in sunny states with high energy prices and good incentives.
Lifetime ROI: With 20–30 year collector life and minimal operating costs, total lifetime savings often reach $20,000–$50,000 depending on system size and displaced fuel type.
Emission reduction: A typical system offsets 1.5–2.5 tons of CO₂ per year, totaling 30–75 tons over its lifetime—equivalent to planting 1,000+ trees.
For detailed cost breakdowns and financing options, explore our complete solar water heater cost guide.

🔧 Maintenance, Monitoring & Troubleshooting Tips
Proper maintenance extends system life to 20–30 years and preserves efficiency. Most tasks take less than an hour per season.
Annual Inspection Checklist
Collector inspection (spring):
- Clean glazing with water and soft brush; remove leaves/debris
- Check vacuum status of evacuated tubes; replace any failed tubes
- Verify mounts and roof flashing for leaks or loosening
- Inspect exposed piping insulation for UV damage; replace if cracked
Glycol loop (every 3 years):
- Test glycol pH (should be 7–9) and freeze point (should protect to your design temperature)
- Replace glycol if pH drops below 7 or freeze protection degrades
- Maintain loop pressure at 20–30 psi; add glycol/water mix if pressure trends downward
Pump & controls (fall):
- Verify pump activates when collector is 10°F hotter than tank
- Check flow rate at manifold using flow meters; clean or descale heat exchanger if flow drops >20%
- Test zone thermostats and pump operation; replace batteries in wireless sensors
Heat exchanger (every 3–5 years):
- Flush with descaling solution to remove mineral buildup
- Inspect for leaks or corrosion at fittings
- Confirm output temperature matches expected differential (typically 5–10°F drop across exchanger)
🚨 Important Note: Heat exchanger fouling from mineral scale and sediment buildup reduces heat transfer efficiency and increases energy consumption. Use treated water and flush regularly.
Monitoring System Performance
Key metrics to track:
- Solar fraction: Compare monthly gas/electric use to pre-solar baseline. Target 50–80% reduction.
- Tank temperature: Should reach 130–160°F on clear days. Lower peaks indicate dirty collectors, low glycol, or failing pump.
- Collector start time: Pump should activate within 30–60 minutes of sunrise on sunny days.
- Zone balancing: All rooms should reach setpoint within 1–2°F. Uneven heating indicates flow imbalance or airlock.
Data logging: Modern controllers log daily solar contribution, pump runtime, and backup cycles. Review monthly to catch performance drops early.
Common Failure Modes & Fixes
Heat exchanger fouling:
- Symptom: Tank temperature rises slowly despite strong sun; outlet temperature from exchanger only 5°F above inlet.
- Cause: Mineral scale coating exchanger surfaces.
- Fix: Flush with citric acid or commercial descaler; switch to treated/softened water; install sediment filter.
Pump burnout:
- Symptom: Pump doesn’t activate even when controller signals on; no flow in solar loop.
- Cause: Bearing failure, motor burnout, or seized impeller from corrosion.
- Fix: Replace pump (typically $200–$400 for residential circulators); verify proper sizing to prevent future overload.
PEX leaks:
- Symptom: Water pooling under slab or subfloor; pressure drop in floor loop; zone doesn’t heat.
- Cause: Mechanical damage during installation, failed crimp connection, or UV degradation (exposed tubing).
- Fix: Pressure-test individual loops to isolate leak; excavate/repair damaged section; replace UV-exposed tubing with insulated runs.
Airlock in floor loops:
- Symptom: Gurgling noises; some zones cold despite pump operation.
- Cause: Air trapped in high points of tubing after initial fill or service.
- Fix: Open bleed valves at manifold high points; run pump at high speed to push air to vents; purge until water flows steadily.
Controller sensor failure:
- Symptom: Pump runs constantly or never starts; displayed temperatures obviously wrong (e.g., 200°F tank in winter).
- Cause: Loose sensor wire, corroded connection, or failed sensor.
- Fix: Check sensor resistance with multimeter (10kΩ thermistors should read ~10kΩ at 77°F); replace sensor if out of spec.
Winter Freeze Protection
Glycol systems (indirect loops):
- Verify glycol concentration protects to 10–20°F below your design winter low
- Insulate all exterior piping with UV-rated, weatherproof insulation
- Add heat tape to vulnerable sections if needed (powered by PV panel for off-grid reliability)
Drainback systems:
- Confirm drainback tank is below all collectors and piping slopes correctly
- Test automatic drainback function by shutting off pump; listen for water draining
- Keep drainback tank and valve accessible; inspect for sludge buildup
For complete cold-climate strategies, see our freeze protection and winterization guide.
Component Lifespan Expectations
| Component | Typical Lifespan | Notes |
|---|---|---|
| Flat-plate collectors | 20–30 years | Hail-rated glazing; quality coatings last decades |
| Evacuated tubes | 15–25 years | Individual tubes replaceable; seals degrade over time |
| Storage tank | 10–20+ years | Anode rod replacement every 3–5 years extends life |
| Heat exchanger | 15–20 years | Regular descaling prevents premature failure |
| Circulator pumps | 10–15 years | ECM pumps last longer than standard PSC motors |
| Controllers | 10–15 years | Electronics fail; keep spares for critical sensors |
| PEX tubing | 25–50 years | Protected from UV and installed correctly |
| Glycol fluid | 5–10 years | Test and replace when pH or freeze-point degrade |
For step-by-step troubleshooting of specific issues like “not heating” or “pump runs constantly,” see our troubleshooting guide.

❓ FAQ: Solar Radiant Floors & Hydronic Systems
Can I retrofit solar radiant heating into an existing home?
Yes, but it’s easier with basement or crawlspace access. Install PEX tubing beneath the subfloor using aluminum heat-transfer plates and insulation. If you have a concrete slab with no access below, consider a thin-pour overlay system (1–2 inch gypsum concrete over existing floor) or switch to panel radiators fed by solar. Retrofits cost 20–40% more than new-construction installs due to access challenges and dust control.
How does solar radiant heating perform in cloudy climates?
Evacuated-tube collectors maintain efficiency even in overcast conditions, delivering 30–50% of summer output on cloudy winter days. Size your storage tank generously (1.5 gallons per sq ft of collector) to buffer multi-day cloudy periods. Backup heating covers extended bad weather. Pacific Northwest homes routinely achieve 50–60% solar fractions with proper design.
Is solar radiant heating suitable for wood floors?
Yes, with careful temperature control. Keep supply water below 130°F and use engineered hardwood or laminate rated for radiant heat. Solid hardwood can cup or crack; if you insist on solid wood, choose quartersawn or rift-sawn boards and acclimatize them in the home for weeks before installation. Tile and stone are ideal; carpet reduces efficiency significantly.
What’s the difference between a solar powered heating mat and embedded PEX tubing?
Solar powered heating mats are pre-assembled panels with tubing, insulation, and manifolds—faster to install but more expensive. Embedded PEX tubing is field-installed in custom patterns, offering maximum flexibility and lower material cost. Both deliver equivalent performance if properly spaced and insulated. Mats suit small retrofits; PEX suits whole-home new construction.
Can I use solar radiant heating for cooling in summer?
Not effectively. Radiant cooling requires chilled water (55–65°F) circulating through floors, which causes condensation problems in humid climates. Solar systems generate heat, not cooling. For summer comfort, pair radiant heating with ceiling fans, window shading, or a separate air-conditioning system. Some advanced systems use solar thermal to drive absorption chillers, but this is complex and expensive for residential use.
How do I prevent my solar radiant system from overheating in summer?
Install a heat-dump radiator or use the excess heat for domestic hot water via a second heat exchanger. Some systems include a summer bypass mode that diverts solar heat away from the floor loops. Alternatively, cover collectors with insulated panels during extended vacations or low-demand periods. Modern controllers can modulate pump speed to limit heat collection when the tank reaches maximum temperature.
What backup heating source pairs best with solar radiant floors?
Gas boilers integrate easily and provide quick, high-BTU backup. Electric boilers or in-tank immersion heaters work well in areas with low electric rates or net-metered solar PV. Heat pumps (air-source or ground-source) offer high efficiency and can be tied into the same hydronic loop. For off-grid homes, wood boilers or propane heaters provide reliable backup without grid dependence.
Do I need a separate water heater for domestic hot water if I have solar radiant heating?
Yes. Radiant heating systems circulate water in a closed loop; mixing domestic hot water with floor-loop water creates contamination and code violations. Use a separate solar water heater or add a second coil in your storage tank dedicated to potable water preheating. Many homeowners install dual-purpose tanks with one coil for radiant heating and a second for domestic hot water.
Can I install solar radiant heating myself to save money?
Skilled DIYers can handle floor tubing installation, basic plumbing, and tank setup. Hiring a pro for collector mounting, glycol commissioning, controller wiring, and final balancing saves headaches and ensures code compliance. Budget $500–$1,000 for professional commissioning even if you DIY the rest. Expect to save $3,000–$8,000 on total project cost with partial DIY. Review our DIY kit recommendations before starting.
How long does it take for a solar radiant floor to warm up?
Concrete slabs have 2–4 hour response times due to high thermal mass. Wood subfloors heat in 30–60 minutes. Plan heating schedules accordingly—start warming a slab-floor home 3–4 hours before you wake up or return from work. Smart thermostats can learn your patterns and preheat automatically using stored solar energy.
🔗 Related Articles
- Solar Water Heaters 101: Types, Pros, Cons, Sizing & How They Work
- Passive vs Active Solar Water Heating: Which One Fits Your Home?
- Evacuated Tubes vs Flat-Plate Collectors: Performance in All Climates
- Step-by-Step: Installing a Residential Solar Water Heating System
- All the Parts You Need: Pumps, Controllers, Valves, Heat Exchangers
- Rebates & Credits: How to Qualify for Solar Hot Water Incentives
- Cold Climate Playbook: Glycol Loops, Drainback & Insulation
- Controls & Automation: Smarter Pumps, Thermostats & Monitoring
