
Troubleshooting Controllers & Sensors: Wiring, Placement, Logic
When your solar water heating system stops delivering hot water—or the pump runs at odd hours—the culprit is often a misbehaving controller or sensor. Controllers orchestrate the dance between collector temperature, tank temperature, and pump operation, but a loose wire, corroded terminal, or misplaced sensor can derail the entire system. This guide walks you through diagnosing wiring faults, verifying sensor placement, and tweaking control logic so you can restore efficient, reliable hot water without an emergency service call.
What you’ll learn:
- How to identify common controller and sensor symptoms.
- Step-by-step wiring diagnostics using a multimeter.
- Best practices for sensor mounting and placement.
- Understanding differential-temperature logic and setpoint adjustments.
- When to DIY and when to call a pro.
Whether you’re troubleshooting a solar water heater controller on a flat-plate system or fine-tuning a solar hot water controller on an evacuated-tube setup, this article equips you with the knowledge to get your system running smoothly again.

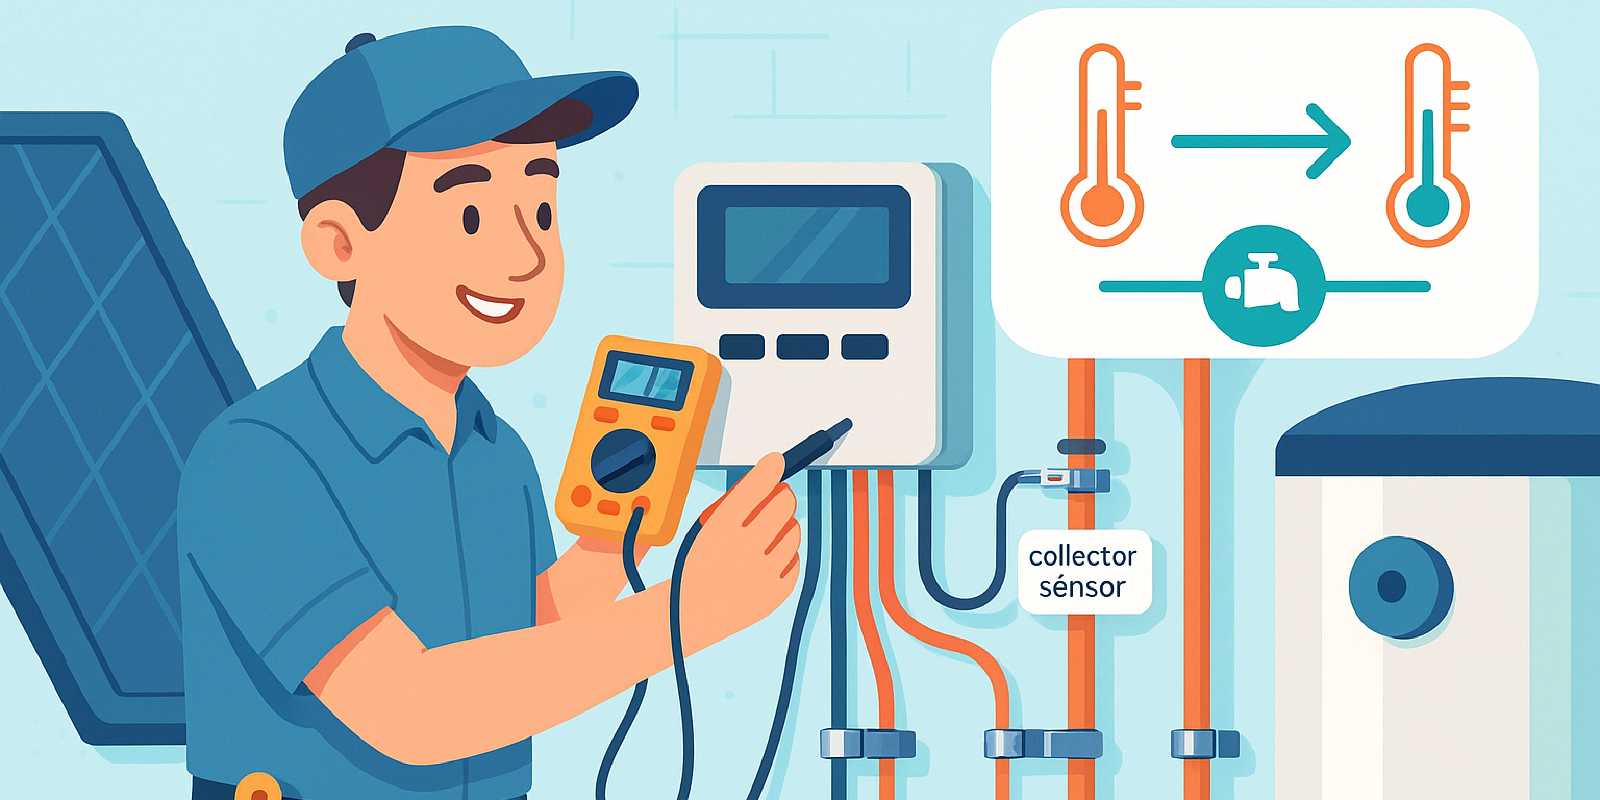
🔧 Anatomy of a Solar Hot Water Controller System
Understanding the components and signal flow in your system is the foundation of effective troubleshooting.
Core Components
Controller:
- The brain of an active solar water heating system.
- Reads temperature inputs from sensors and decides when to run the solar water heating pump.
- Common models include AquaGen, Raypak, Navien, SunMaxx, and Rheem controllers.
Temperature Sensors:
- Typically two: one on the solar collector and one on the storage tank.
- Measure temperature using resistance (thermistor) or voltage (thermocouple).
- Collector sensor: Monitors heat available at the panels.
- Tank sensor: Tracks stored water temperature.
Circulation Pump:
- Activated by the controller when the collector is hotter than the tank by a set threshold (differential temperature, or delta-T).
- Moves fluid through the loop to transfer heat.
Wiring:
- Low-voltage sensor cables (typically 18–22 AWG) from sensors to the controller.
- Pump circuit wiring (typically 120V AC) from controller relay to pump motor.
Optional Components:
- Freeze sensors (for drainback or glycol systems in cold climates).
- Overheat sensors or high-limit switches to prevent stagnation.
- Auxiliary elements like a solar power immersion heater for backup heat.
How the System Works
- Sensor Inputs: The controller continuously reads temperatures from the collector and tank sensors.
- Delta-T Calculation: The controller compares the two temperatures. If the collector is warmer than the tank by a preset amount (e.g., 5–10°C), it signals the pump to run.
- Pump Operation: The pump circulates fluid, transferring heat from the collector to the tank.
- Shutdown Logic: When the temperature difference falls below a lower threshold (e.g., 2–3°C) or the tank reaches a maximum setpoint, the controller stops the pump to prevent heat loss or overheating.
Common Architectures:
- Direct active: Potable water circulates through collectors and back to tank; sensors measure water temperature directly.
- Indirect active: Glycol loop with heat exchanger; sensors measure glycol and tank temperatures.
- Drainback: Pump empties the collector loop when off; sensors must account for dry collectors.
💡 Personal Tip: Label your sensors and wiring during installation. A simple “Collector Sensor” or “Tank Sensor” tag can save hours of head-scratching later.
For a deeper dive into how these systems fit together, see our step-by-step installation guide and parts overview.

🔍 Spotting Trouble: Symptoms and Root Causes
Recognizing the symptoms of controller or sensor failure helps you zero in on the right troubleshooting steps.
Pump Won’t Run (System Inactive During Sunny Hours)
Symptoms:
- Bright sunshine, but circulation pump is silent.
- No warm water from collectors.
Common Causes:
- Sensor disconnected or corroded: Loose plug, damaged cable, or corrosion at terminals.
- Sensor short circuit: Faulty sensor reads abnormal resistance.
- Controller power issue: Breaker tripped, blown fuse, or wiring fault.
- Incorrect wiring: Reversed or swapped sensors.
- Failed pump or relay: Pump motor seized or controller relay stuck.
Quick Checks:
- Verify power to controller (LED indicators lit).
- Check sensor plugs for tight connection and clean contacts.
- Listen for relay click when pump should activate.
Pump Runs at Night or Continuously
Symptoms:
- Pump operates after sunset or in cloudy weather.
- No solar gain, yet pump cycles on.
Common Causes:
- Collector sensor short circuit: Controller thinks collector is hotter than it is.
- Tank sensor open circuit: Controller can’t read tank temperature and defaults to “pump on.”
- Reversed sensor wiring: Collector and tank sensors swapped.
- Faulty controller logic: Incorrect setpoints or malfunctioning board.
Quick Checks:
- Swap sensor cables at the controller to test if the problem follows the sensor or stays with the port.
- Measure sensor resistance (see Wiring Tests section below).
Erratic Pump Cycling (Relay Clicking Rapidly)
Symptoms:
- Pump starts and stops every few seconds.
- Relay clicking or buzzing audible at controller.
Common Causes:
- Loose sensor contact: Intermittent connection causes temperature readings to fluctuate.
- Damaged sensor probe: Internal fault creates erratic resistance.
- Corroded or oxidized terminals: Poor electrical contact.
- Temperature oscillation: Setpoints too narrow, causing repeated on/off cycles near threshold.
Quick Checks:
- Re-seat sensor plugs firmly.
- Inspect cables for pinch points, UV damage, or rodent chewing.
- Adjust differential setpoints if cycling occurs near threshold temperatures.
Error Codes or LED Flashing
Symptoms:
- Controller displays error codes (e.g., 77, 88, 99 on AquaGen models).
- LED flashing on sensor indicators (pool sensor, roof sensor).
Common Causes:
- Sensor fault: Disconnected, short-circuited, or out-of-range resistance.
- Wiring damage: Cut or corroded sensor cables.
- Controller self-diagnostic: Board detects abnormal input.
Reference: Common error codes on popular 2023–2025 residential controllers:
| Error Code / LED Pattern | Meaning | Common Cause | Remedy |
|---|---|---|---|
| 77, 88, 99 | Sensor fault | Disconnected or shorted sensor | Check wiring; replace sensor |
| Sensor LED flashing | Sensor fault | Damaged cable or bad sensor | Re-seat; replace if needed |
| Relay clicking rapidly | Erratic sensor input | Loose contact or faulty probe | Test resistance; replace sensor |
| Pump runs at night | Collector sensor short | False hot reading | Swap sensors; test resistance |
Source: Supreme Heating sensor fault guide, Kesun Solar troubleshooting, U.S. Department of Energy maintenance page.
Inaccurate Temperature Readings or Low Performance
Symptoms:
- Controller displays unrealistic temperatures (e.g., 32°F in summer sun).
- System underperforms despite good weather.
- Pump rarely runs or runs too often.
Common Causes:
- Sensor placement: Sensor not securely fastened to the surface it monitors; gap or air pocket causes false readings.
- Low-quality sensor: Cheap or off-brand sensors drift over time.
- Calibration drift: Older sensors read 5–10°C off actual temperature.
Impact:
- Temperature accuracy loss: Misplaced or poorly-contacted sensors can cause measurement errors of 5–10°C, according to industry troubleshooting guides (Kesun Solar, Energy Saver guide).
- Pump-cycle inefficiency: Field reports indicate poor sensor placement can lead to 30–50% more pump cycles, wasting energy and increasing wear (DIY Solar Forum, Solar Panel Talk).
Quick Checks:
- Touch sensor with a calibrated thermometer to verify reading.
- Ensure sensor is clamped tightly with stainless steel hose clamps or manufacturer-specified lugs.
💬 Expert Advice: Industry guides from the U.S. Department of Energy and leading manufacturers consistently recommend annual sensor inspection and secure mounting to avoid costly inefficiencies.
For broader troubleshooting of system performance issues, see our general troubleshooting guide.

⚡ Wiring Tests: Tools, Diagrams & Safety Steps
Accurate wiring diagnostics are the key to pinpointing electrical faults in your solar heater controller and sensor circuits.
Tools You’ll Need
Essential:
- Digital multimeter (DMM) with resistance (ohms) and voltage (AC/DC) settings.
- Small flathead screwdriver for terminal screws.
- Pen and paper to record readings.
Recommended:
- Wiring diagram from your controller’s manual.
- Flashlight for inspecting connections in dim spaces.
- Wire strippers and electrical tape (for repairs).
- Infrared thermometer or meat thermometer (for calibration checks).
💡 Personal Tip: A cheap grocery-store meat thermometer is surprisingly effective for verifying sensor accuracy. Clamp the sensor and thermometer to the same pipe, then compare readings after a few minutes.
Safety First
Before touching any wiring:
- Turn off power to the controller at the breaker or disconnect switch.
- Verify zero voltage with your multimeter before handling wires.
- Low-voltage sensor circuits (typically <24V DC) are safer, but pump circuits are often 120V AC and can be lethal.
- Follow NEC guidelines: While specific 2023 NEC sections for solar thermal sensor and pump circuits were not available in our research, always consult local codes and a licensed electrician for pump circuit work if you’re unsure.
Testing Sensor Resistance
Why: Sensors use thermistors whose resistance changes predictably with temperature. Measuring resistance confirms sensor health.
Steps:
- Disconnect sensor from controller (unplug or remove wires from terminals).
- Set multimeter to ohms (Ω).
- Measure resistance across sensor leads.
- Compare to reference chart in your controller manual (typical values: 10kΩ at 25°C for 10k thermistors; consult your specific model).
Example Reference Values (Typical 10k NTC Thermistor):
| Temperature | Resistance |
|---|---|
| 0°C (32°F) | ~32 kΩ |
| 25°C (77°F) | ~10 kΩ |
| 50°C (122°F) | ~3.6 kΩ |
| 80°C (176°F) | ~1.2 kΩ |
Interpreting Results:
- Reading matches chart: Sensor is good.
- Open circuit (infinite resistance): Sensor or cable is broken.
- Short circuit (near-zero resistance): Sensor is shorted internally or wiring is damaged.
- Reading far off: Sensor has drifted or is faulty; replace.
Sensor Swap Test: If resistance seems normal but problems persist, swap the collector and tank sensors at the controller. If the problem moves with the sensor, the sensor is faulty. If the problem stays with the same controller port, the controller may be at fault.
Testing Sensor Wiring
Why: Cables can be damaged by UV exposure, rodents, pinch points, or corrosion.
Steps:
- Disconnect both ends of the sensor cable.
- Set multimeter to continuity or low ohms.
- Test each wire from one end to the other (should read near-zero ohms for intact wire).
- Test for shorts between wires (should read infinite resistance).
Common Cable Issues:
- UV degradation: Outdoor cables without UV-rated insulation crack and short.
- Rodent damage: Chewed cables are a frequent culprit in attics or crawl spaces.
- Corrosion: Moisture in outdoor junction boxes corrodes terminals.
Fixes:
- Splice damaged cables with UV-rated heat-shrink connectors.
- Replace heavily corroded cables entirely.
- Use conduit or protective sleeving in exposed areas.
Testing the Pump Circuit
Why: Verify the controller’s relay and pump motor are functional.
Steps (with power off):
- Locate pump circuit wires at controller output terminals (usually labeled “Pump” or “Load”).
- Disconnect pump wires.
- Restore power to controller and trigger pump operation (manual mode or wait for delta-T condition).
- Measure voltage across pump output terminals with multimeter set to AC voltage.
- Should read ~120V AC (or rated voltage) when pump is commanded on.
- Should read 0V when pump is commanded off.
If voltage is present but pump doesn’t run:
- Test pump motor directly: Disconnect pump from controller; apply power directly to pump terminals (use extreme caution with 120V AC). If pump runs, controller relay is faulty. If pump doesn’t run, motor or starting capacitor is bad.
If no voltage at pump terminals:
- Check relay: Listen for relay click when pump should activate. No click = faulty relay or controller board.
- Inspect wiring: Loose or corroded terminal screws at controller output.
Pump Motor Troubleshooting (from manufacturer flowcharts): Common steps from Rheem, SunEarth, and Heliodyne manuals:
- Verify controller power and sensor inputs are correct.
- Check controller relay actuation (listen for click or measure voltage at pump terminals).
- Run pump manually by powering directly to isolate controller vs. pump fault.
- If pump hums but doesn’t start, replace starting capacitor.
- If pump is silent when powered, replace pump motor.
💬 Expert Advice: Rheem and SunEarth manuals emphasize that sensor faults are the #1 cause of non-running pumps. Always verify sensors before replacing pumps or controllers.
For more on pump and control components, see our parts guide.

📍 Sensor Placement: Do’s, Don’ts, & Re-Mounting Tips
Proper sensor placement is critical to accurate temperature readings and efficient solar water heating design. A sensor that’s fallen off or mounted in the wrong spot can cripple performance.
Collector Sensor Placement
Best Practices:
- Location: Clamp sensor to the hottest point in the collector loop—typically the outlet pipe leaving the collector array.
- Mounting: Use stainless steel hose clamps or manufacturer-supplied lugs to secure the sensor tightly against the pipe.
- Insulation: After clamping, wrap sensor and pipe with foam pipe insulation to shield from ambient air and wind, ensuring the sensor reads pipe temperature, not air temperature.
- Orientation: Position sensor on the underside or side of the pipe (not on top where sun could directly heat it).
Common Mistakes:
- ❌ Sensor taped loosely to pipe with air gap—reads ambient temperature instead of fluid.
- ❌ Sensor placed on cold supply line or inlet pipe instead of hot outlet.
- ❌ Sensor exposed to direct sunlight or wind without insulation—false high or low readings.
- ❌ Sensor mounted inside collector box where it can overheat beyond fluid temperature.
Re-Mounting: If your sensor has fallen off or reads inaccurately:
- Clean pipe surface with alcohol to remove dirt or old adhesive.
- Wrap sensor probe tightly against pipe with stainless clamp.
- Apply thermal paste (optional, used by some installers) between sensor and pipe for better contact.
- Insulate over sensor and surrounding pipe.
- Secure cable with UV-rated cable ties; avoid sharp bends.
Tank Sensor Placement
Best Practices:
- Location: Clamp sensor to the middle or lower third of the storage tank to measure bulk water temperature (not just the hot stratified layer at top).
- Mounting: Use pipe clamps or sensor wells (immersion sensors) if tank has a dedicated port.
- Insulation: Insulate sensor and surrounding tank to prevent false reads from ambient air.
Common Mistakes:
- ❌ Sensor mounted too high on tank—controller reads only the hottest layer; pump may not activate when middle/bottom is cool.
- ❌ Sensor mounted on external jacket with air gap—reads insulation temperature, not water.
- ❌ Sensor loose or dangling—vibration or movement causes intermittent readings.
Tank Sensor Types:
- Surface-mount: Clamped to tank exterior; requires good thermal contact and insulation.
- Immersion: Inserted into a threaded well in tank; more accurate but requires compatible tank port.
Freeze Sensor Placement (Cold Climates)
Purpose: Detects when collector loop is at risk of freezing; triggers pump or drain-down valve.
Best Practices:
- Location: Coldest point in the loop—typically the collector outlet or exposed outdoor piping.
- Setpoint: Typically 3–5°C (37–41°F) to activate before freeze damage.
- Insulation: Do not insulate freeze sensor; it must sense ambient cold.
Failure Modes:
- Misplaced sensor (e.g., on warm indoor pipe) won’t detect outdoor freeze risk.
- Corroded or detached sensor fails to trigger freeze protection, leading to costly burst pipes.
Wiring and Cable Routing
Do’s:
- Use UV-rated cable outdoors or in exposed areas.
- Route cables in conduit or protective sleeving where vulnerable.
- Secure cables every 1–2 feet with UV-rated cable ties.
- Avoid sharp bends or kinks that can damage conductors.
- Keep sensor cables away from high-voltage AC lines to prevent interference.
Don’ts:
- ❌ Don’t leave excess cable coiled near hot pipes (can overheat insulation).
- ❌ Don’t run sensor cables through areas frequented by rodents without protection.
- ❌ Don’t staple or nail cables (can sever conductors).
💡 Personal Tip: When I re-mounted a fallen collector sensor on my system, I used a stainless steel screw-type hose clamp (like those for automotive radiator hoses) and foam pipe insulation rated for 150°C. The sensor has stayed put for five years, and readings are consistent.
For a comprehensive installation overview including sensor placement, see our installation guide.

🧠 Understanding Control Logic & Parameter Settings
Knowing how your controller makes decisions empowers you to optimize performance and diagnose logic-related issues.
Differential Temperature (Delta-T) Logic
How It Works: The controller compares collector temperature (T_collector) and tank temperature (T_tank). When:
- T_collector > T_tank + ΔT_on: Pump turns on to transfer heat.
- T_collector < T_tank + ΔT_off: Pump turns off to prevent heat loss.
Typical Settings:
- ΔT_on: 5–10°C (9–18°F) — Collector must be this much hotter than tank to start pump.
- ΔT_off: 2–3°C (3.6–5.4°F) — Pump stops when temperature difference falls below this.
Why These Settings Matter:
- Too narrow: Pump cycles on and off frequently (wear, inefficiency).
- Too wide: Pump starts late and stops early (lost solar gain).
Adjusting Setpoints: Most controllers allow setpoint adjustment via dials, buttons, or app. Consult your manual for access.
When to Adjust:
- Frequent cycling: Increase ΔT_on or widen the gap between ΔT_on and ΔT_off.
- Poor collection: Decrease ΔT_on (e.g., from 10°C to 7°C) to capture marginal solar gain.
- Seasonal tuning: Lower thresholds in winter to maximize limited sun; raise in summer to avoid short-cycling.
💬 Expert Advice: While no recent (2023–2024) peer-reviewed case studies quantify exact savings from setpoint adjustments, industry experts and the U.S. Department of Energy’s Energy Saver guide recommend regular review and adjustment of these settings as part of routine maintenance for maximum efficiency.
High-Limit (Maximum Tank Temperature)
Purpose: Prevents tank from overheating on high-sun, low-demand days.
Typical Setting: 60–70°C (140–158°F).
How It Works: If tank sensor reads above the high-limit setpoint, the controller stops the pump even if the collector is hotter.
Adjusting:
- Lower limit: If you’re worried about scalding or have a solar power immersion heater backup that can take over.
- Raise limit: If you want maximum storage capacity and have an anti-scald mixing valve downstream.
Caution: Setting the limit too high can cause stagnation and pressure-relief valve discharge. Always use a mixing valve for domestic hot water to prevent scalding.
Night-Time Shutdown Logic
Purpose: Prevent reverse thermosiphoning (hot water flowing backward and cooling in collectors at night).
How It Works:
- Some controllers disable the pump when collector temperature is below a threshold (e.g., below tank temperature).
- Advanced controllers use time-based logic (pump off from sunset to sunrise) or ambient light sensors.
Benefits:
- Prevents heat loss from tank to cold collectors.
- Reduces pump runtime and energy use.
When to Enable: Always, unless you’re using a thermosiphon (passive) system that relies on gravity circulation.
Manual Override and Test Modes
Purpose: Force pump on or off for testing and maintenance.
How to Use:
- Manual On: Activates pump regardless of sensor readings. Useful for:
- Testing pump operation.
- Purging air from loop.
- Verifying flow and checking for leaks.
- Manual Off: Stops pump for maintenance or when system is idle.
Access: Typically via a button or switch on the controller. Refer to your manual.
Caution: Don’t leave system in manual mode—return to automatic after testing.
Printable Differential-Temperature Troubleshooting Flowchart
Use this flowchart to diagnose delta-T logic issues:
Step 1: Is pump running during sunny hours?
- No → Check sensors and wiring (see Wiring Tests section).
- Yes → Continue to Step 2.
Step 2: Is T_collector > T_tank + ΔT_on?
- No → Normal; pump should not run.
- Yes → Pump should be running. If not, check controller relay and pump motor.
Step 3: Does pump stop when T_collector < T_tank + ΔT_off?
- Yes → Normal operation.
- No → Check for stuck relay, controller fault, or incorrect setpoints.
Step 4: Is pump cycling on/off rapidly?
- Yes → Sensor loose, faulty, or setpoints too narrow. Adjust ΔT_on/off or replace sensor.
- No → System operating correctly.
For more on optimizing controller settings, see our controls and automation guide.

🛠️ Quick Fixes vs. Major Repairs: Decision Guide
Not every problem requires a pro. Here’s how to decide whether to DIY or call for help.
DIY-Friendly Fixes (Under 1 Hour, Basic Tools)
✅ Re-seat or clean sensor connections:
- Unplug sensors, clean terminals with contact cleaner or isopropyl alcohol, and reconnect firmly.
- Time: 10–15 minutes.
- Cost: $0 (or $5 for contact cleaner).
✅ Re-mount loose sensor:
- Clamp sensor securely to pipe with stainless steel hose clamp; insulate.
- Time: 15–30 minutes.
- Cost: $5–$10 (clamps, insulation).
✅ Replace damaged sensor:
- Order replacement sensor (typically $20–$50); swap old for new; verify resistance.
- Time: 20–40 minutes.
- Cost: $20–$50.
✅ Adjust controller setpoints:
- Access settings menu; tweak ΔT_on/off or high-limit; test operation.
- Time: 10–20 minutes.
- Cost: $0.
✅ Splice damaged cable:
- Cut out damaged section; use UV-rated crimp connectors or solder and heat-shrink; test continuity.
- Time: 30–60 minutes.
- Cost: $10–$20.
✅ Test and reset breaker:
- If controller has no power, check breaker and reset if tripped.
- Time: 5 minutes.
- Cost: $0.
Professional Service Recommended (1–3 Hours, Specialized Skills)
🔧 Replace pump motor:
- Requires draining loop, disconnecting plumbing, and wiring new pump.
- Complexity: Moderate plumbing and electrical skills.
- Cost: $200–$600 (pump + labor).
- DIY risk: Improper wiring can damage controller or create hazards.
🔧 Replace controller board:
- Requires re-wiring all sensors and pump circuits; potential for misconfiguration.
- Complexity: Moderate electrical skills and controller programming.
- Cost: $150–$400 (controller + labor).
- DIY risk: Incorrect wiring can damage new board.
🔧 Diagnose and repair complex electrical faults:
- Intermittent shorts, grounding issues, or voltage anomalies.
- Complexity: Advanced electrical troubleshooting and multimeter skills.
- Cost: $100–$300 (labor).
- DIY risk: Electrical hazards and prolonged downtime.
🔧 Modify system design (e.g., relocate sensors or rewire loop):
- Requires knowledge of solar water heating design principles and code compliance.
- Complexity: High; may require permits.
- Cost: $200–$1,000+ depending on scope.
- DIY risk: Poor design can reduce performance or violate code.
Decision Matrix: DIY vs. Pro Service Call
| Symptom | Likely Cause | DIY Fix? | Pro Service? |
|---|---|---|---|
| Sensor fault error code | Loose connection | ✅ | ❌ |
| Sensor reads 0Ω or ∞Ω | Failed sensor | ✅ | ❌ |
| Pump won’t run; no relay click | Controller relay fault | ❌ | ✅ |
| Pump hums but won’t start | Bad starting capacitor | ⚠️ DIY if comfortable with 120V AC | ✅ |
| Erratic cycling | Loose sensor or narrow setpoint | ✅ | ❌ |
| Damaged cable (rodent chew) | Cable repair/replace | ✅ | ❌ |
| Controller dead; no power | Breaker or board failure | ✅ (check breaker) | ✅ (replace board) |
| Complex wiring issue | Unknown | ❌ | ✅ |
When in Doubt: If you’re uncomfortable with electrical work, or if the issue persists after basic troubleshooting, call a licensed solar installer or electrician. The cost of a service call is often less than the cost of replacing damaged equipment due to a DIY mistake.
💡 Personal Tip: I once spent two hours chasing a “faulty controller” only to discover a corroded connection in an outdoor junction box. A $5 replacement connector and 15 minutes later, my system was back online. Always check the simple stuff first.
For a full range of maintenance tips, see our maintenance and winterization guide.

❓ FAQ: Homeowner Questions on Controllers & Sensors
Why does my pump run at night?
A short-circuited collector sensor or open-circuited tank sensor can cause the controller to misread temperatures and run the pump when it shouldn’t. Test sensor resistance and verify wiring. Sources: Supreme Heating, Kesun Solar.
How do I know if my sensor is bad?
Measure resistance across the sensor leads with a multimeter and compare to the manufacturer’s reference chart. Out-of-range readings (0Ω, ∞Ω, or far off chart) indicate a faulty sensor. Also swap sensors to see if the problem moves.
Can I use any replacement sensor?
No. Sensors are typically matched to controller models by resistance curve (e.g., 10k NTC thermistor). Using the wrong sensor can cause inaccurate readings or controller errors. Always use the manufacturer-recommended part or a verified compatible replacement.
What if my controller has no error code but the pump still won’t run?
Check that sensors are securely mounted, wiring is intact, and setpoints are correct. Manually trigger the pump (if your controller has a test mode). If the pump runs manually, the sensors or logic settings may be the issue. If not, the pump or controller relay may be faulty.
How often should I check sensor placement?
Inspect sensors annually as part of routine maintenance. Look for loose clamps, damaged insulation, or corrosion. Re-tighten clamps and replace damaged insulation promptly. Source: U.S. Department of Energy.
Can I adjust controller setpoints to improve winter performance?
Yes. Lowering the ΔT_on threshold (e.g., from 10°C to 7°C) can help capture marginal winter sun. However, be cautious not to set it too low, as the pump may cycle excessively on cloudy days. Test adjustments over a few days and monitor performance. For more on cold-climate optimization, see our cold climate playbook.
What are the most common wiring mistakes?
- Reversed collector and tank sensors.
- Loose or corroded terminal connections.
- UV-degraded outdoor cables.
- Sensor cables routed near high-voltage AC lines (causes interference).
- Sensors not insulated, leading to false ambient readings.
Is it safe to work on the pump circuit?
Pump circuits are typically 120V AC and can be dangerous. Always turn off power at the breaker, verify zero voltage with a multimeter, and follow all safety precautions. If you’re not confident working with AC voltage, hire a licensed electrician.
How much does a service call cost?
Typical diagnostic service calls range from $100–$300, depending on location and complexity. Parts (sensors, pumps, controllers) are additional. Many installers offer annual maintenance packages that include controller and sensor checks at a reduced rate.
🔄 Related Articles
- Troubleshooting Guide: Not Hot Enough, Pump Stuck, Freeze Damage
- All the Parts You Need: Pumps, Controllers, Valves, Heat Exchangers
- Controls & Automation: Smarter Pumps, Thermostats, Monitoring
- Maintenance & Winterization: Keep Your Solar Hot Water Running
- Step-by-Step: Installing a Residential Solar Water Heating System
- Cold Climate Playbook: Glycol Loops, Drainback, Insulation
